Sunday, December 30, 2012

MY TOP 10 CRAFT SUPPLIES FOR 2012

Hi readers!
Today, as this year is coming to the end, I decided to share my top 10 craft products for 2012!
Here we go!

10-BUTTONS
Buttons are a huge addiction of mine. I like them on cards, frames, altered projects ... on everything!
And here are some of my favorites!


etsy.com also carries a huge variety of buttons !

9 - PEARLS AND GEMS
These can be scattered around a card to create a nice effect, I can say that I use them quite often...
I like use the self-adhesive, but I also like to use the Anita's ones that come in a million of colors and sizes and you can adhere with a tiny dot of glossy accents!


8 - BAKER'S TWINE
Nice addition to every project. Doodlebug twines are my faves, but Queen & Co also makes nice twines - in the most wonderful colors!

etsy.com also carries a huge variety of twines!


7 - FISKARS STAMP PRESS
A really nice tool that can give you great stamp images with precision due to its foam feet...with gridlines so can really help to line up stamped images!

6 - HERO ARTS SHADOW INKS
All of them are great! Crisp images that smooth out as they dry, ideal for bold stamped images and backgrounds!
All of their colors are great! A must have!

5 - GLOSSY ACCENTS
This is the must have adhesive. It can adhere EVERYTHING, EVERYWHERE !


4 - DIES 
What can I say about dies! Such a great investment, versatile and you can use them over and over again...
Some of my very faves are the bigz dies and the wafer thin dies (Sizzix and Memory box).

3 - SIZZIX BIG SHOT
The best die cutting machine ever!


2 - DISTRESS INKS/STAINS
Distress Inks are addictive! You know it?
These inks with water do really fun things, a truly artistic result is what you get every time you use them. There are many many techniques out there and they are a really good investment. In 2012 I finally completed the full collection!
Stains are the liquid form of these inks. I personally love the white picket fence and the metallics that came out few months ago...!


1 - HERO ARTS STAMPS
My number one for 2012 is Hero Arts stamps! Why?
Fabulous designs, great quality, hundreds of techniques involve stamps! Need more?
These are my favorite designs - can't get enough! And their new 2013 catalogue is fantastic - I am still waiting my order to arrive...
Also, the stamp and die combos are fantastic right?

Anyways, thanks for visiting!
Have a happy, creative and joyful 2013!

George Panayiotou


Tuesday, December 25, 2012

Merry Christmas :-)

Merry Christmas everyone !!!!

Just a quick share, a christmas tree ornament I made few days ago... 
I love the Caged bird Sizzix bigz die from Tim Holtz, with which I cut a piece of chipboard covered with fabric!
The bird was cut from grungeboard - I like how distress inks work with it so well. So after I inked the bird with broken china, peacock feathers and salty ocean, I added some touches of walnut stain around the edges. After was completely dry, I applied a THICK layer of clear rock candy distress crackle paint and let it dry on its own. To intensify the cracks, I went over with a blending tool and some walnut stain distress ink...
The back of the birdcage is covered with a piece of acetate, stamped with white Stazon Ink.
Simple, even though it needs some time to put it together is totally worth it :-)


And here is another one - in red ! The cage was covered with vintage book paper - and lightly inked with brushed pewter distress stain - nice metallic effect! Here the bird was inked with festive berries and fired brick distress inks !


Again, Merry Christmas and Happy New Year!

George x


Friday, December 7, 2012

HeroArts contest - November Round 2 - Fab5 again:-)

Hi readers!
I am happy! And winning for 3rd time on HeroArts monthly contest is more than I expect!
Here is my card for November round 2 winners ! Hope you like it :-)
Congratulations to all winners - check them out HERE !


Cu soon!
Love, George

Saturday, October 6, 2012

Happy World Cardmaking Day !

Hello creative people!

I am sharing today a card I made, celebrating the World Cardmaking Day, today 6/10 !
I decided to use some new favorites, like the air vent die from SSS, new papers from Echo Park, and Hero Arts stamps (as always) !!!


The sentiment was printed on some patterned paper of the same collection!

Happy World Cardmaking Day everyone and don's stop creating, inspire and be inspired!

George

Tuesday, September 25, 2012

Workshops !

Good morning crafty and creative people!
I want to share my new series of workshops in Stitches, Stitching and Craft Supplies in Limassol, Cyprus...
Here we go!


  • Holiday Cards Using Distress Ink Techniques


This will be a three week workshop featuring techniques with distress inks for holiday cards!

WEEK 1
16/10/2012 OR 20/10/2012
Swatches
Color Combinations
Basic Inking
Inked Backgrounds
Watercolor Stamping
Embossing Folders and Distress Inks


WEEK 2
23/10/2012 OR 27/10/2012
Heat Emboss Resist
Heat Emboss Resist with Iron Off
Traditional Resist
Acrylic Paint Resist


WEEK 3
30/10/2012 OR 3/11/2012
Water coloring With Distress Inks
Distress Inks and Re-inkers
Masking
Distress Inks with Sticky Back Canvas and other materials


+During all three weeks we will be focusing on mentioned techniques and we will be creating 3 projects in each class – cards, gift tags and Christmas decorations.
+Using non-holiday stamps and products for Christmas cards
+Card Sketches and class instruction sheet
+More ideas for non-holiday cards using the techniques in each week’s class.

  • SENTIMENTAL CARDS 6/11/2012 or 10/11/2012


  • HOME FOR CHRISTMAS BY PAPERMANIA WORKSHOP 13/11/2012 or 17/11/2012


For more info, visit Stitches, stitching and craft supplies fb page!
http://www.facebook.com/stitchescyprus

Friday, September 7, 2012

Inspiration from ......


A KLEENEX BOX ????


YES !

When I saw this kleenex box I was so impressed by the design - all these colorful quadrants !!!
So, yes ... it inspired me so much that I created a card based on that design! So fun and so happy, and the black makes everything look so bold and vivid!


Thanks for stopping by !
George xxx

Thursday, September 6, 2012

Hero Arts - August Round 2 Winner !!!

Hello readers !

I am very excited and happy for winning the HERO ARTS competition for August Round 2!
My card is featured in August's Fab Five Creations!
Please take a look of my card below and please visit Hero Arts Blog for more info!


Thanks for your support and for all the kind comments :-)

George/GPA Handmade


Monday, September 3, 2012

Computer Generated Sentiments For Cardmaking !

Hello September!
Hello crafty people!

I am so glad and happy we left behind a really hot, uninspiring and tiring summer here in Cyprus!

Today I am sharing my digital stamps and the way you can use your computer in cardmaking and scrapbooking!

Sometimes -eventhouh I love stamps- I cannot find the perfect sentiment for my cards. Sometimes size doesn't fit, or for me being greek, I want greek sentiments on my cards. What I do??

I design and print the greetings on lightweight card stock and cut them with my trimmer! And is cool !
The most simple software to do that is Microsoft Word, so give it a try!

And this technique comes in hand when you need to make few really fast cards...

I have designed for all of you a set ( a pdf ) that includes useful sentiments for card and also I created 5 cards using them !


Here I used a standard size card with the fold on top, I glued down some kraft card stock, added some buttons with glue dots, and finally I added the greeting with two layers of dimensional adhesive!


This card feature another greeting from the set on a skinny card (this is a standard size card that I trimmed off 2 cm from the side)....
The paper collection here is from Papermania Capsule Collection by Jessie Edwards.


And another one for Christening - Christening sentiments are so hard to find in stamp sets .... :(


This butterfly is a die-cut from Anita's A4 Pearlescent Flutterdies Toppers. The white piece on the back is made of with Distress inks (Walnut Stain, Brushed Corduroy, Vintage Photo) that I mixed with water and by using a brush, I splattered drops of the inks....
I also made 5 horizontal lines using my scoring board...


Some cool masking and misting with Distress Inks ( Distress Ink + Water in a mini mister ). Here I've used Pine Needles and Dusty Concord. I added foam adhesive on the sentiment to make it pop and also I added some gems....


Hope that inspires you to use the digital stamp I designed and your computer+printer to create your own sentiments....

Btw, I designed the circles to be cut with a 2 inches circle punch that allows to create a white frame around the greeting, but you can also use your scissors to cut this out!


Please let me know your thought and your comments!!!!

You can download the Digital Stamps here:


Thanks for visiting my blog!

George

Thursday, June 21, 2012

Good News !!!!!!!!!

Hi readers!


I have some good news today to share - I am the fresh face winner for Hero Arts June (Round 1) Contest!
My card is based on the sketch challenge for this month!
I am really excited!
Thanks Hero Arts for the great products and all the inspiration you are giving to us !


Here is the card!


Congrats to all the winners!
You can find more about the contest here!


George

Friday, June 15, 2012

ONLINE INSPIRATION JUNE 2012 - Good Friends Frame

Hello !
Its the 15th of the month (time goes by sooo fast....) and it is time again for an online inspiration tutorial!
This month I decided to make a frame. The inspiration comes from Echo Park Times and Seasons Collection - nice patterns, nice masculine colors....
Lets go !


1. The frame I am using is 13cm x 18cm with white frame.


2. Using the Tim Holtz Chip Block die and my Sizzix Big Shot (with lots of patience...) I cut the letters for my sentiment : GOOD FRIENDS MAKE EVERYTHING BETTER.


3. In order to make the background, I cut several strips of the papers of the collection.


4. I've used the white sheet that was inside the frame, and I adhered the strips on the diagonal using double sided tape. Then I cut the excess.


5. Now the difficult part. I got a  piece of kraft paper.


Using Glossy Accents, I adhered the letters.
Starting from the longest word (in this case the word friends) and based on that I started adhering the letters in the center of the kraft card stock.
(It is really helpful if you arrange the letters on your work area first in order to have an idea about spacing and avoid misplacing the letters.)


Then I cut the craft piece to the desired size and I went around with a white gel pen and I did some dashed lines...


Because I had marks of the Glossy Accents showing around some letters :-(  I decided to go over the piece with Claudine Helmuth Matte Multi Medium with a brush. It worked! The glossy accents marks disappeared...


6. Time for the assembly!


Using some strong glue I adhered the piece with the letters on top of the diagonal background I created, and I placed the piece in the frame.


7. For some fun, I scattered some gems.


Hope you like it!


You can take a look on this AWSOME  collection from ECHO PARK....
(Honestly - all their collections are soooo nice - can't get enough...)


George

Friday, June 1, 2012

Clarity Stamps from Stitches, Stitching and Craft Supplies

Hello craft friends!


This post is about a really amazing and high quality stamp company, Clarity Stamps!
Few weeks ago, the wonderful Kathryn at Stitches, gave me a Clarity stamp to try out. I was surprised!  So nice designs and so good quality ! I am in love with the air ballon, that inspired me to create a fun set of cards, with bold summer colors!


Clarity stamps are made of Photopolymer, thats why they cost a bit more that other stamps out there. Photopolymer stamps give really crisp stamped images because they take the ink better. Here is some info from their website:


WHAT'S THE DIFFERENCE BETWEEN PHOTOPOLYMER STAMPS AND SILICONE OR ACRYLIC STAMPS? Photopolymer stamps are not to be confused with these. They may also be see-through, but they are not the same thing and do not perform in the same way. Photopolymer Resin is intended to take ink. Silicone and acrylic don't take ink in the same way - so the reproduction is not as effective. They may be less expensive, but the proof is in the print!
Claritystamps are also heat-resistant when using fusible film and fibre techniques, and will not distort or melt, even when used with molten embossing powders and hot waxes. 
So, Clarity stamps come in a variety of designs and sizes. 
SOS ! There is a blue coating on the stamp (obviously to protect the stamp) so before use it, ink the stamp with a dark color ink and stamp a couple of times to remove the coating. And don't use a light color ink like I did the first time :-P !


So here is what I came up with :


Simple and fun! My new addiction is to have the card smaller (cut about 1cm - 1.5 cm off a top folded standard size card) and having the greeting hanging off the card, so the card will still fit in an envelope!
The hot air balloons are heat embossed with white embossing powder on some watercolor paper and watercolored with....Distress Inks (of course !!!!!)
Also the greetings are heat embossed with white on some kraft/recycled paper.
For the background, I stamp the cloud (from my stash) and then I used some Distress Inks and water (by taping the ink pad on my craft sheet, spritzed with water to make the color runny) and then I splashed the color on the background using a brush! Then I scattered some gems for an extra something! 
I also stamped the envelope with the same color ink I used for coloring the images....


And because I couldn't stop :-) I made a big card for a great friend!!!

If you haven't used Clarity stamps, you must! Sooooo good !

Clarity Stamps are available from STITCHES STITCHING AND CRAFT SUPPLIES
59 Griva Digenis Street, Ayios Tychonas, 4521 Limassol, Cyprus
Tel:357 25345618 Fax: 357 25324112 
Click here to visit the online shop ( by the way, there are many more stamps in the store) !
George


Tuesday, May 15, 2012

ONLINE INSPIRATION MAY 2012 - Spring Seasonal Distress Inks

Hello :-)
New Spring Seasonal Distress Inks are super wow!!!!
So for this month's ONLINE INSPIRATION, I decided  to make 3 cards, one for each color!


Of course my favorite is Peacock Feathers!
And for all the cards I used the new Hero Arts + Basic Grey Flower Medley Background !!!!

Lets start:


PEACOCK FEATHERS


Here I decided to make something special! I covered completely a piece of regular card stock with the ink. I let it dry and then I inked the stamp with Picket Fence Distress Stain (another wow product). I spritzed some water with perfect pearls and I stamped. I have no words to describe the result..... You have to see it in person to understand ! It is amazing! And tough by Jennifer McGuire !
The sentiment is stamped with VersaMark on some vellum and white heat embossed. And of course is wrapped around the card and secured with adhesive on the inside.

SQUEEZED LEMONADE


This color is so refreshing! I did nothing fancy here. I simply used the same stamp and some good quality watercolor paper, heat embossed the stamped design, applied the ink with a foam applicator and the blending tool and then I spritzed water. Lots of water. This created paddles of ink and water and made some areas lighter and some darker. 

SHADED LILAC


At first I thought that this color is awful! (Sorry!!) But when I've used it I though is really good (But I prefer Dusty Concord instead) !!!
I added some perfect pearls mist after I did what I did with above card (Squeezed Lemonade) !


Here are some details of the cards!


And a little nice decoration for my craft room .... :-)


Thats All Crafty People!
Happy Inking!

George

Supplies:


Friday, May 11, 2012

(Heart) U Mom All The Time Card


Hi!
Today I was inspired from the new My mind's Eye Indie Chic Nutmeg paper pad and I decided to use it make to a Mother's Day Card.
I spent around 3 hours to have it done but totally worth it!
The sentiment is inspired by Kristina Werner but I took it one step further by adding the clock and have it say 'all the time'. 
So, Happy Mother's Day!


Thanks mom for everything you've done for me ! xxxx


George

Supplies: 

Sunday, May 6, 2012

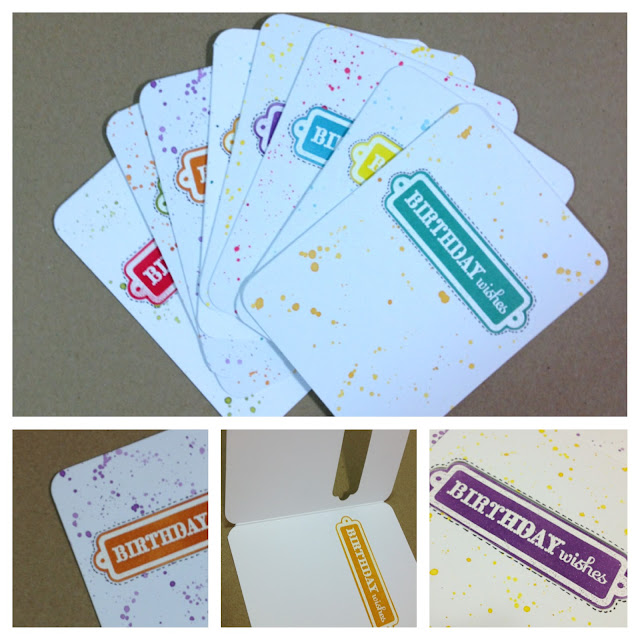
Artistic Birthday Card Set


Hello  crafty people!
I have a quick birthday card set to share today. Artistic, colorful and fun! And of course I've used once more (!) my favorite stamps since I started stamping: HERO ARTS !


HOW TO:

1 I’ve used white thick cardstock to create the card base for all the set. You have to use thick cardstock because this will help the ink later to be absorbed better….

Then I’ve used my favorite distress inks…by dabbing some ink into my Ranger’s craft sheet. Then I added a bit of water and using a brush I splattered the ink allover the card base, both front and back sides!

Then after letting it dry completely and using the die from Hero Arts that coordinates the stamp and my Sizzix big –shot, I die cut a window on the front.

After that, I’ve stamped the Birthday Wishes stamp from Hero Arts with Versamark and I heat embossed in white. Then I’ve used my favorite distress inks again…and I went over the image with the blending tool. Try use contrasting color, it really makes the card bright and fun ! Then I die-cut the embossed resist images out using the Hero Arts Die.

At the end, I glued the pieces on the inside of the card right on the die-cut window!
Simple, fun and super easy!

Hope you enjoyed it!

LIST OF SUPPLIES:

George x

Wednesday, April 11, 2012

ONLINE INSPIRATION - APRIL 2012 - 1 Stamp for 5 cards!


Hello!


My ‘Online Inspiration’ is basically an online step by step workshop and will be on my blog each month, around the 15th of each month. Each time, I will be showing something different, this might be a card, more that one card, or some kind of technique. All products will be linked under the post. I am waiting your comments, thoughts or questions. Enjoy!


This month, I decided to challenge myself! To use the same stamp as the main element, for 5 cards! And I made it!!!
There are so many techniques you can make with stamps and inks...more than you can imagine...


I am posting this earlier this month (because of Easter Holidays) ! Hope you like it!
Happy Easter to all of you! 


 Hello Card

Cut 3 stripes of color paper of your choice, about 4cm x 8.5cm and using strong adhesive (I like double sided tape) stick the pieces on some scratch paper, to create a strong base. Then ink the stamp with Distress Embossing Ink and stamp. Apply clear embossing powder and heat emboss. Let it cool down and mount the piece on some white cardstock leaving a small frame around.

Stamp on the left corner the greeting (In this case I used the hello greeting from the set) with Archival Ink in Jet Black.

Stick the piece in the center of a black standard size card.


Enjoy Your Birthday

Use a piece of cardstock (don’t use porous paper – it will not work) and cover completely with Dusty Concord distress ink by applying the ink directly using the pad. Let it dry.
Ink the stamp with Picket Fence distress stain (great product – cant get enough!!).
Spray some water with mini mister ( or use some perfect pearls in white color if you want to be shiny) and carefully stamp the flower in the center of the purple cardstock. Don’t lift the stamp immediately, allow few seconds letting the ink to be absorbed! Let it dry.
Round the corners of the standard size card, and the corners of the piece we created and glue it to the center of the card.
Stamp a large greeting on top of the flower using Archival Ink in Jet black.
Go around with a black pen and create small dots or faux stitching. This brings in the black and balances the card!


Thank You
Simple and elegant. And you can reproduce this card in minutes.

Use a card base which is thick and absorbent. I like using watercolor paper.
 Using markers (there are a lot of markers in the marker that 
you can use coloring directly on the stamp – I like the Zig ones – Memento are good as well – and Tombow….) 
color directly on the stamp starting with the lighter colors first and then moving on to the darker shades.
Then go over with a mini mister filled with water, 
mist the stamp a couple of times. Now stamp the design on the right side of the card. Let it dry.
Go around with an Inksentials blending tool and Walnut Stain distress ink and ink the edges of the card to make them darker.
Stamp the greeting on the left corner. Here I used the Thank You greeting with Archival Ink in Coffee.

Note that if you don’t have any markers, you can use distress inks and 
apply several shades of ink to the stamp. You will mist with water again and stamp.


Thinking Of You

Cut a piece of scratch paper 7.5cm x 11cm and apply some removable adhesive.
 Place it dead center on the front of a standard size card with the fold on top.
Use a mini mister filled with water and add 6 drops of walnut stain distress ink re-inker. 
Shake and spray 3-4 times to achieve an even coverage.
 Let it dry and remove the scratch paper.
Cut 1.5 cm stripes of scratch paper and apply removable adhesive. 
Place them around the card to cover the border we created by misting the ink before.
Use Archival Ink in Coffee color, ink the stamp very well and then stamp 
the image off to the right side.
Remove the scratch paper and go around the inside border with a brown marker or pen to crate dash lines.
Use a small greeting  (I like these small stamps by Hero Arts) and stamp on some brown cardstock using Versamark. Apply white embossing powder and heat emboss.
Attach the greeting to the card


Simple Hydrangea - No greeting

Cut a piece of watercolor paper 8.5 cm x 12 cm. Ink the stamp using Distress Embossing Ink and stamp. Press very well as the watercolor paper is rough and textured and we need a crisp image. Apply some white embossing powder and heat emboss.
Then apply Scattered straw distress ink starting from the top up to the middle. Then start applying Evergreen bough distress ink (is one of the 3 new colors from seasonal distress ink released during Christmas). Overlap the inks in the center. Then spray with some water and perfect pearls mixture (or use plain water). This will blend the colors and will create a nice look - you have to try this....
 Let it dry and glue the piece on some craft cardstock. Trim leaving a small border and using 3D adhesive mount the piece of the center of the card.


Thanks a lot! Cu next month with another 'Online Inspiration' ! George x


SUPPLIES: